How to Automate I: Understanding Flumine
I have had a go at automating models and trading bots on Betfair for the better part of a year now, although I am not successful enough to quit my full time job, I've come across a tonne of different hurdles and issues. Resources online can sometimes be scarce or hard to understand if you are not either a software engineer or have a dev background.
So this is the first part of a multipart series of that go through all the things you need to know to reach the end goal of learning how to automate the model Bruno taught us how to build in his greyhound modelling tutorial. At the very end we will also create a script to simulate the exchange to backtest the strategies we have created so that we can optimize our strategies. We will be using the Flumine package and all the code we create will be available on github so you can in your own models and strategies.
This series will be split into five parts which goes into:
- Part I - Understanding how Flumine works
- Part II - Automating backing or laying the 1st/2nd/.../nth favourite
- Part III - How to Automate one of Betfair's Data Science Models
- Part IV - How to Automate the model Bruno taught us how to build
- Part V - How to simulate the Exchange to backtest and optimise our strategies
Understanding the Betfair API
Before we dive into the Flumine package, or any code lets gain some understanding about the Betfair API. Betfair offers their API in two forms a Rest API and a Push API often call the polling and streaming API. We don't really need to know the technical differences between a Rest API and a Push API, but there are a few key differences on the Betfair API that is important to note:
Rest API (Polling)
- Only returns a snap shot of data, everytime you want more data you must make a new request and wait for a response
- Market catalogue and all information available in market catalogue such as Runner names or Market event names are available
Push API (Streaming)
- Only need to connect once, any updates will be sent to you as an update
- Only contains some information such as prices, Market catalogue is not available
Because streaming gives real time pricing information it is much better than polling, but it doesn't include some key information such as the names of horses/sport teams. So, the solution is to use both streaming and polling together.
If you are crazy and like to build everything from scratch, feel free to work out how to use them together and to build out your betting infrastructure. But if you would like to remain sane the great thing about Flumine is that it automatically combines the two together, so you get the benefit of both real time pricing and also all the information provided in the polling API.
There is both documentation for the Betfair API and for Flumine however a quick note is that the documentation for the Betfair API is generally in camelCase e.g. selectionId or marketId whereas Flumine being a python package follows the PEP 8 style guide e.g. selection_id and market_id. Basically this just means whenever we see something on the Betfair documentation page the equivalent for Flumine will be in lower_case_with_underscores.
General code structure and context
Flumine is designed as a general framework that allows you to create custom strategies and operationalise them on specific markets, handling all the bet placement and market subscription.
Using Flumine your general code structure will look like this:
- Login
- Create your strategy as a new Python Class
- Choose the markets/sports and controls for your strategy
- Adding workers
- Run your strategy
The bulk of the coding required is a simple copy paste job, there are only a few things you need to change such as what you specify in your strategy
Login
This tutorial will assume that you have an API app key. If you don't, please follow the steps outlined here.
You will also need to have streaming enabled on your API app key, to get it enabled email automation@betfair.com.au
You can use the Flumine package with or without certificates. There have been quite a lot of discussions of how useful the security certificates are on the Betcode (formerly Betfairlightweight) slack group, but the general consensus is that its not too useful. Considering it is an extreme hassle to create the certificates and there is no really added benefit I prefer to log in without the certificates.
However, if I haven't dissuaded you there are detailed instructions on how to generate certificates. For a windows machine, follow the instructions outlined here. For alternate instructions for Windows, or for Mac/Linux machines, follow the instructions outlined here. You should then create a folder for your certs, perhaps named 'certs' and grab the path location.
Besides that, the code for logging in will basically always be the same, so you can always copy and paste this! Be sure to fill in your username, password, appkeys (and the directory where your security certificates are stored if you created them).
# Import libraries for logging in
import betfairlightweight
from flumine import Flumine, clients

# Credentials to login and logging in
trading = betfairlightweight.APIClient('username','password',app_key='appkey')
client = clients.BetfairClient(trading, interactive_login=True)

# Login
framework = Flumine(client=client)

# Code to login when using security certificates
# trading = betfairlightweight.APIClient('username','password',app_key='appkey', certs=r'C:\Users\zhoui\openssl_certs')
# client = clients.BetfairClient(trading)

# framework = Flumine(client=client)
Create your strategy as a new Python class
This is probably the only slightly difficult part and after reading through this tutorial, it should be super easy!
Before we delve straight into how this part works, we first need to understand some basics of how Classes work in Python. If you know this already, feel free to skip to the Creating our strategy section.
Background info - Python Object Oriented Programming:
Classes and Methods
Let's create a new class in Python. This will allow us to define an object of this type later on, just like how we can create an integer, string or boolean.
Now that we have created a new class called Fruit, we can now create Fruit objects, the same way we can define an object as a string or an integer.
For example if we wanted to define a variable x as an integer with the value 6:
Now we can do the same thing with Fruit:
In Python methods are functions that you can define inside a class which run when called. For example let's take a look at the upper() method for strings:
Let's add a few methods to the fruit class we created earlier to calculate the total price for us:
class Fruit():
    # Initialize
    def __init__(self, colour, taste, size, price_per_size) -> None:
        self.colour = colour
        self.taste = taste
        self.size = size
        self.price_per_size = price_per_size
        pass

    ### New part (rest is the same):
    # Creating first method, print the total price
    def print_total_price(self):
        print(f'The total_price is {self.size*self.price_per_size}')
    # Creating second method, return the second price
    def return_total_price(self):
        return(self.size*self.price_per_size)
Now that we have defined the methods, we can call them like this:
Class inheritance
Now that we know a bit about Classes and Methods in Python, all that's left to learn is Class inheritance.
In Python can create a class of another class e.g.
Class_2 is known as the child class and Class_1 is known as the parent classThe child class (Class_2) inherit all the attributes and methods of the parent class (Class_1)
- But the key thing for us is that the child class (Class_2) can override the methods and attributes it inherits from the parent class (Class_1)
So, going back to our fruit example lets create a child class that inherit from the fruit class as an example:
We have now created another new class, this one called avocado, it is the same as the original parent class (Fruit), but we have overridden the print_total_price method
We can see all the attributes behave in the way we expect:
But now when we call our two methods, return_total_price works in the same way as a fruit class would, but now print_total_price is different because we have overridden it:
Now that we know how class in heritance works, we have armed ourselves with everything we need to know how to work with Flumine so let's tie everything together.
Creating our strategy as a child class from BaseStrategy
Bringing what we have learned about methods and class inheritance. Flumine already has a class called BaseStrategy that is designed to be used as a parent class. Each of the methods defined in BaseStrategy are called automatically at specific times such as when someone places a bet. The idea is to you take BaseStrategy as your Parent Class and then write over the methods that get automatically called with what we want our bot to do.
Flumine essentially loops through and automatically calls the methods that have been defined, so all you need to do is override the methods, to suit your strategy.
If we adopt the way Flumine does things to our fruit example it will look a little like this:
Let's go through an example with a simple strategy that I tested many, many times to understand the intricacies of Flumine before we move onto anything more complex. Let's attempt to lay all selections at a price of 1.01, the good thing is as long as this isn't inplay we basically never get matched using this strategy so we can use it to test a tonne of things. The other good thing about Flumine is that by default you can only have 1 trade live (waiting to be matched) per selection at any one time. So running the below code will only place one bet per selection and another will not be placed untill the first get matched.
If we take a closer look at the documentation and source code we can get an idea of the methods available and the ones that are run automatically.
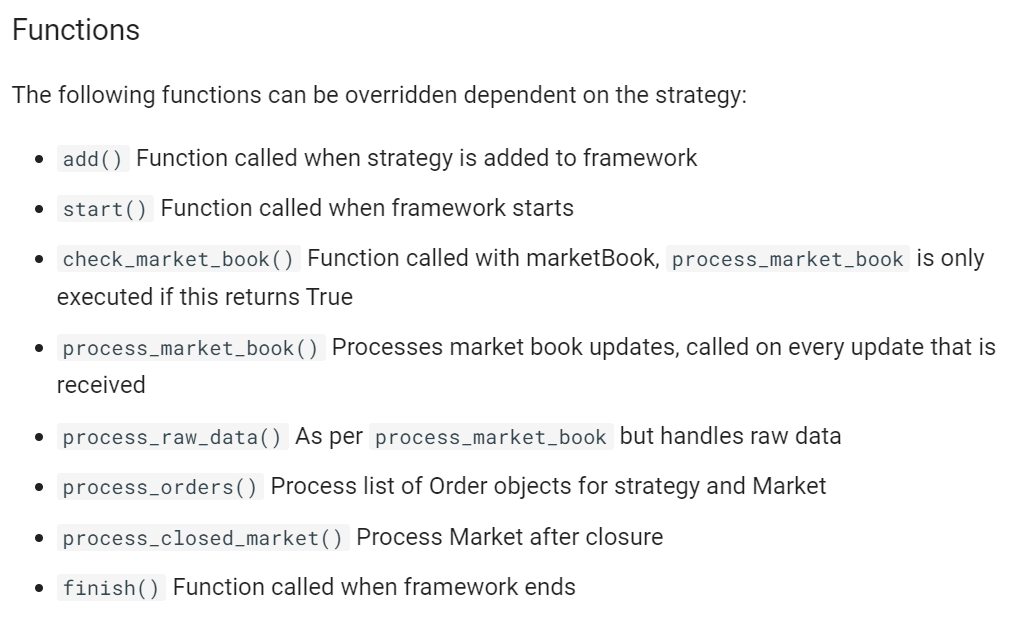
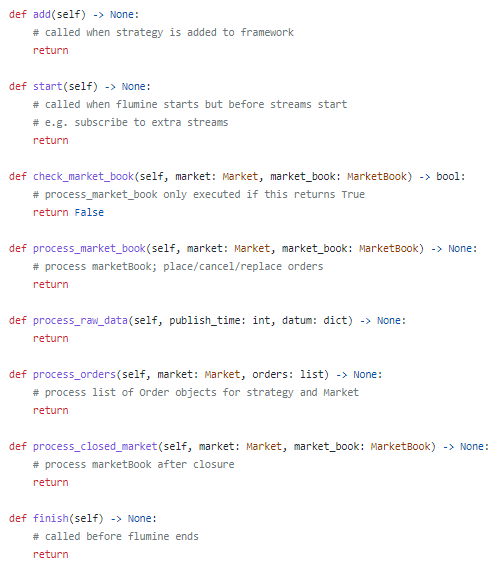
Basically the way Flumine works is any code you have under start runs when you first hit play, then whenever there is an update to the market check_market_book runs and if that returns true then process_market_book and process_orders will run. An update is whenever anyone places/cancels/modifies a bet for that specific market e.g. R7 Flemmington Win. By default Flumine will run continuously without stopping (we will learn how to make it stop later on).
For something simple like placing a single bet per selection in a race check_market_book and process_market_book are pretty much the only method we really needed to edit. So our code structure will look something like this:
def start():
    # This is called when you first start up your strategy, generally don't have anything important here

def check_market_book():
    # You need this to return True, otherwise process_market_book won't run, by default it will return False
    # generally used to check if the market is open and if not, we skip that market

def process_market_book():
    # This is where you want the bulk of the logic for your strategy
    # Any code here will initially run once when check_market_book() returns True and also run each time anyone on on the exchange places or cancels a order this market
    # This is where I prefer to have my bet placement logic
If you have something in mind that is more complicated such as needing the constantly change the price of your bets, then you can test out process_orders. But for now, let's have a crack at implementing our simple strategy.
# Import necessary libraries
from flumine import BaseStrategy
from flumine.order.trade import Trade
from flumine.order.order import LimitOrder, OrderStatus
from flumine.markets.market import Market
from betfairlightweight.filters import streaming_market_filter
from betfairlightweight.resources import MarketBook

# Create a new strategy as a new class called LayStrategy, this in turn will allow us to create a new Python object later
    # LayStrategy is a child class inheriting from a class in Flumine we imported above called BaseStrategy
class LayStrategy(BaseStrategy):
    # Defines what happens when we start our strategy i.e. this method will run once when we first start running our strategy
    def start(self) -> None:
        print("starting strategy 'LayStrategy'")

    # Prevent looking at markets that are closed
    def check_market_book(self, market: Market, market_book: MarketBook) -> bool:
        # process_market_book only executed if this returns True
        if market_book.status != "CLOSED":
            return True

    # If check_market_book returns true i.e. the market is open and not closed then we will run process_market_book once initially
    #  After the first initial time, process_market_book runs every single time someone places, updates or cancels a bet
    def process_market_book(self, market: Market, market_book: MarketBook) -> None:
        for runner in market_book.runners: # Loops through each of the runners in the race
            if runner.status == "ACTIVE": # If the runner is active (hasen't been scratched)
                # Place a lay bet at a price of 1.01 with $5 volume
                trade = Trade(
                    market_id=market_book.market_id, # The market_id for the specific market
                    selection_id=runner.selection_id, # The selection_id of the horse/dog/team
                    handicap=runner.handicap, # The handicap of the horse/dog/team
                    strategy=self, # Strategy this bet is part of: itself (LayStrategy)
                )
                order = trade.create_order(
                    side="LAY", order_type=LimitOrder(price=1.01, size=5.00) # Lay bet, Limit order price of 1.01 size = $5
                )
                market.place_order(order) # Place the order
You may have noticed that when I did for runner in market_book.runners: I knew market_book had runners as an attribute, this is because I've spent ages in Flumine, but you can find all this information in Betfair Documentation page, and I would recommend the Betting Type Definitions page. If you are reading through the docs and want to use something from market_book you already have that readily available, but if you want to use something from the polling API such as market_catalogue then Flumine has this available as an attribute under market. So you will need to do something like: market.market_catalogue. We will go through an example of this in How to Automate IV. Quick word of warning, the first few seconds after Flumine starts market.market_catalogue will return None as it hasn't requested data from the polling api yet, but give it a few seconds and it will run fine.
Back to the above strategy, you may be thinking that in LayStrategy we will be placing millions of lay bets of $5 at odds of 1.01 because we place a bet whenever process_market_book get called, which happens anytime someone in the same market places, updates or cancels a bet. But it won't because by default there are controls in place that limits the number of bets Flumine will place. Later on we will learn how to adjust them. This means that while the Flumine is incredibly powerful it could be devastating with incorrect code.
Choose the markets/sports and controls for your strategy
Now that we have created our strategy all we need to do is to choose what sports to run it on and any trading controls we may have.
To actually turn on our strategy we need to define a new variable as a LayStrategy object. Going back to our Avocado example it would look like this:
When we define fresh_avocado as an Avocado class, we need to include multiple attributes such as colour, taste, size and price_per_size. As avocado is a child class of fruit, we can take a look at fruit for what we need to include.
We need to do the same thing for our LayStrategy. The attributes that we need to include can be found in the documentation for BaseStrategy:
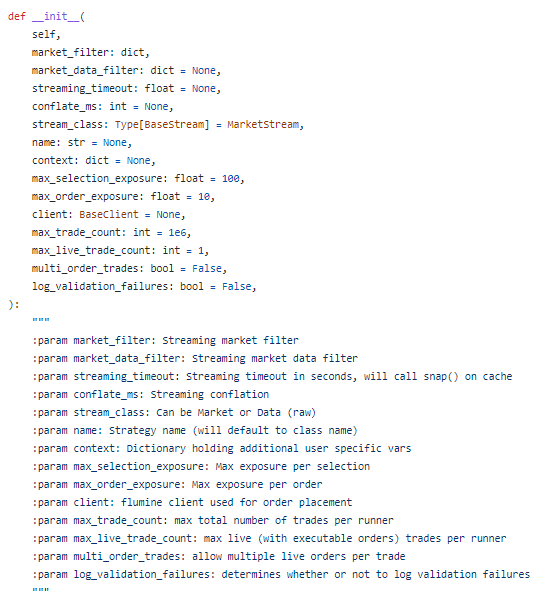
We can see that some of the attributes have default values such as max_order_exposure, but others have None. You can play around with them, for now lets just set market_filter to only bet on greyhound win markets. If you ever get confused (it happens) you can take a look at the
Betting Type Definitions.
This is actually one of the really cool things about Flumine, all you need to do is point it at a particular criteria e.g. all greyhound win markets in Australia and it will run your strategy on all those markets.
And now we can add the strategy to framework and run it!
Troubleshooting (the most important part that is one line of code)
Sooner or later, you will run into some sort of error. It's bound to happen. But instead of spending hours scratching your head and contemplating throwing out your laptop there is a simple one-line solution:
This is called logging and there is a two part YouTube tutorial that explains it far better than I ever could.
Basically, the line of code above will enable logging and create a new file called 'how_to_automate_1.log' in the same folder as this Python script. By default Flumine has a tonne of logging which will now be enabled with the line above and write logs to that file. So anytime there is an error we can easily pinpoint what the error is.
Put that line of code somewhere near the top of your script and it will save you hours wondering why your code doesn't work.
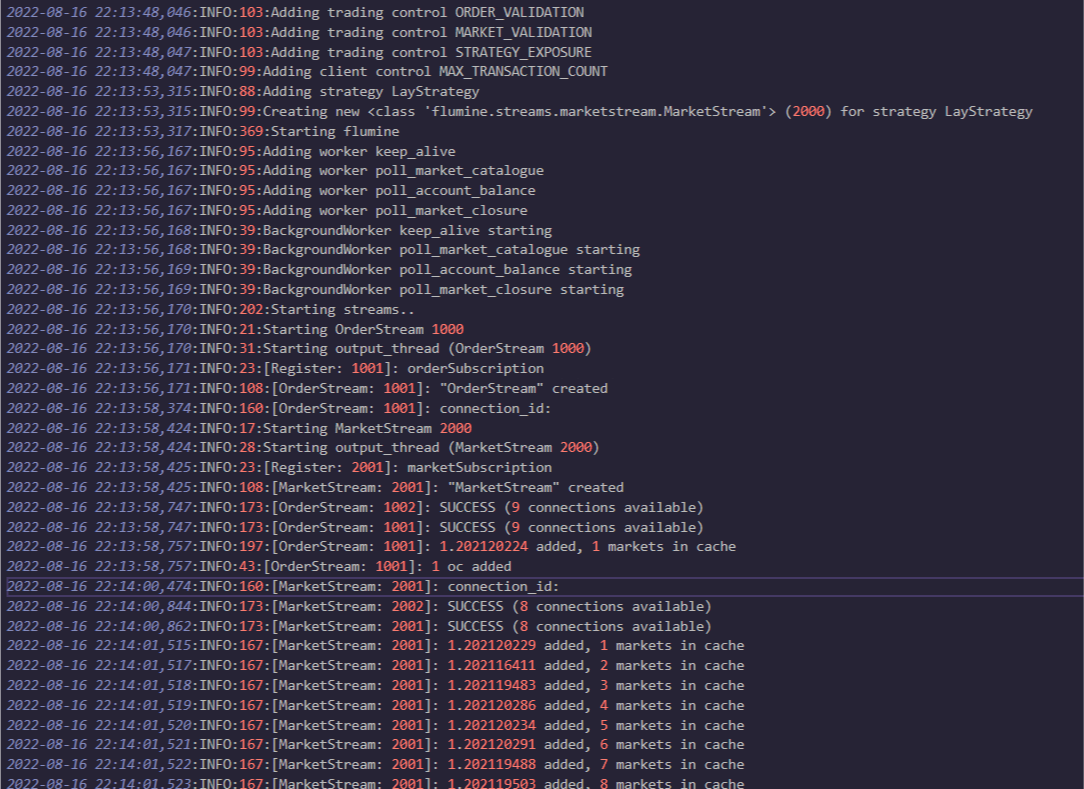
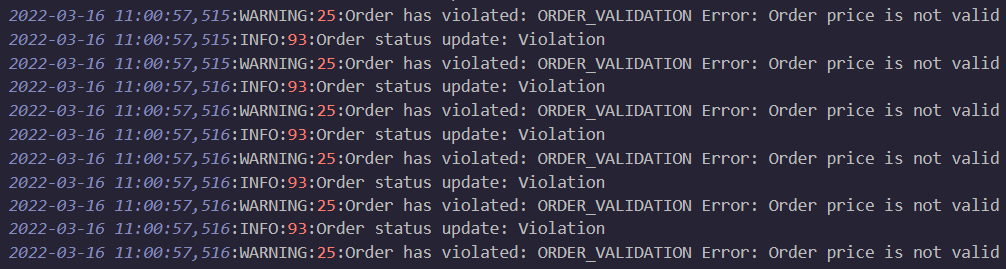
There is one slight drawback, and that basically everything that indicates your code is running smoothly will now go into the log file instead of printing out in your terminal. I would recommend the first time you run your strategy to open the log file so you can see what Flumine is doing, it will look a little like this:
Let's do something stupid, so we can see how easy it is to pinpoint errors with logging. Let's do the same strategy as above, but with a price of 0.9 instead of 1.01, clearly something that isn't allowed
# Import libraries for logging in
import betfairlightweight
from flumine import Flumine, clients
from flumine import BaseStrategy
from flumine.order.trade import Trade
from flumine.order.order import LimitOrder, OrderStatus
from flumine.markets.market import Market
from betfairlightweight.filters import streaming_market_filter
from betfairlightweight.resources import MarketBook
import logging

# Credentials to login and logging in
trading = betfairlightweight.APIClient('username','password',app_key='appkey')
client = clients.BetfairClient(trading, interactive_login=True)

# Login
framework = Flumine(client=client)

logging.basicConfig(filename = 'how_to_automate_1.log', level=logging.INFO, format='%(asctime)s:%(levelname)s:%(message)s')


class LayStrategy(BaseStrategy):
    def start(self) -> None:
        print("starting strategy 'LayStrategy'")

    def check_market_book(self, market: Market, market_book: MarketBook) -> bool:
        # process_market_book only executed if this returns True
        if market_book.status != "CLOSED":
            return True

    def process_market_book(self, market: Market, market_book: MarketBook) -> None:
        for runner in market_book.runners:
            if runner.status == "ACTIVE":

                # Place a lay bet at a price of 0.9 with $5 size
                trade = Trade(
                    market_id=market_book.market_id,
                    selection_id=runner.selection_id,
                    handicap=runner.handicap,
                    strategy=self,
                )
                order = trade.create_order(
                    side="LAY", order_type=LimitOrder(price=0.9, size=5)
                )
                market.place_order(order)

strategy = LayStrategy(
    market_filter=streaming_market_filter(
        event_type_ids=["4339"],
        country_codes=["AU"],
        market_types=["WIN"],
    )
)

framework.add_strategy(strategy)

framework.run()
If we open the log file a few seconds after running the code (you can open it using your code editor or a text editor like notepad) we can see that it shows us what the error is:
(I have spent a lot of time looking through log files...)
Conclusion and next steps
Now that we understand the basics of how Flumine works, this is where the fun begins! There are three more parts of this series which goes more in-depth into automating different angles, the Betfair datascience models and eventually our final goal: our own model.
- Part II - Automating backing or laying the 1st/2nd/.../nth favourite
- Part III - Automating a Betfair model
- Part IV - Automating your own model
- Part V - How to simulate the Exchange to backtest and optimise our strategies

Complete Code
Run the code from your ide by using py <filename>.py, making sure you amend the path to point to your input data.
# Import libraries for logging in
import betfairlightweight
from flumine import Flumine, clients
from flumine import BaseStrategy
from flumine.order.trade import Trade
from flumine.order.order import LimitOrder, OrderStatus
from flumine.markets.market import Market
from betfairlightweight.filters import streaming_market_filter
from betfairlightweight.resources import MarketBook
import logging

# Import libraries for logging in
import betfairlightweight
from flumine import Flumine, clients

# Credentials to login and logging in
trading = betfairlightweight.APIClient('username','password',app_key='appkey')
client = clients.BetfairClient(trading, interactive_login=True)

# Login
framework = Flumine(client=client)

# Code to login when using security certificates
# trading = betfairlightweight.APIClient('username','password',app_key='appkey', certs=r'C:\Users\zhoui\openssl_certs')
# client = clients.BetfairClient(trading)

# framework = Flumine(client=client)

logging.basicConfig(filename = 'how_to_automate_1.log', level=logging.INFO, format='%(asctime)s:%(levelname)s:%(message)s')

# Create a new strategy as a new class called LayStrategy, this in turn will allow us to create a new Python object later
    # LayStrategy is a child class inheriting from a class in Flumine we imported above called BaseStrategy
class LayStrategy(BaseStrategy):
    # Defines what happens when we start our strategy i.e. this method will run once when we first start running our strategy
    def start(self) -> None:
        print("starting strategy 'LayStrategy'")

    # Prevent looking at markets that are closed
    def check_market_book(self, market: Market, market_book: MarketBook) -> bool:
        # process_market_book only executed if this returns True
        if market_book.status != "CLOSED":
            return True

    # If check_market_book returns true i.e. the market is open and not closed then we will run process_market_book once initially
    #  After the first initial time, process_market_book runs every single time someone places, updates or cancels a bet
    def process_market_book(self, market: Market, market_book: MarketBook) -> None:
        for runner in market_book.runners: # Loops through each of the runners in the race
            if runner.status == "ACTIVE": # If the runner is active (hasen't been scratched)
                # Place a lay bet at a price of 1.01 with $5 volume
                trade = Trade(
                    market_id=market_book.market_id, # The market_id for the specific market
                    selection_id=runner.selection_id, # The selection_id of the horse/dog/team
                    handicap=runner.handicap, # The handicap of the horse/dog/team
                    strategy=self, # Strategy this bet is part of: itself (LayStrategy)
                )
                order = trade.create_order(
                    side="LAY", order_type=LimitOrder(price=1.01, size=5.00) # Lay bet, Limit order price of 1.01 size = $5
                )
                market.place_order(order) # Place the order

strategy = LayStrategy(
    market_filter=streaming_market_filter(
        event_type_ids=["4339"], # Greyhounds
        country_codes=["AU"], # Australia
        market_types=["WIN"], # Win Markets
    )
)

framework.add_strategy(strategy)

framework.run()
Disclaimer
Note that whilst models and automated strategies are fun and rewarding to create, we can't promise that your model or betting strategy will be profitable, and we make no representations in relation to the code shared or information on this page. If you're using this code or implementing your own strategies, you do so entirely at your own risk and you are responsible for any winnings/losses incurred. Under no circumstances will Betfair be liable for any loss or damage you suffer.